Pizza is the hardest menu in food service to model in software. A burger is a burger; a pizza is a size, a crust, a sauce, a cheese level, toppings that may apply to one half or both, plus a cooking instruction. Get pizza POS modifiers right and your line moves fast with accurate tickets. Get them wrong and you’ll bleed time at the counter and money on remakes.
Key takeaways
- Model your menu as guided modifier groups: size and crust first (required), then toppings (optional, priced).
- Handle half-and-half with separate left/right topping groups so tickets are unambiguous.
- Attach upcharges to the options themselves — never rely on staff remembering to add $1.50.
- Aim to build your most-ordered pizza in under five taps.
- The same modifier setup should drive your register, online menu, and phone orders.
Start with the shape of a pizza order
Before touching the software, write down how an order is actually constructed in your shop. For most pizzerias it’s:
- Size — required, drives the base price (10”, 12”, 16”, party)
- Crust — required, sometimes with an upcharge (thin, regular, pan, gluten-free, stuffed)
- Sauce — usually required, usually free (tomato, garlic, BBQ, none)
- Cheese — optional level (regular, light, extra, none, vegan)
- Toppings — optional, priced, potentially per-half
- Instructions — free text (well done, cut in squares, no herbs on top)
That ordering matters. Required choices first prevents staff from getting three toppings deep and realizing they never picked a size.
Building it in SeroPOS
In SeroPOS these are modifier groups, attached to your pizza products. Each group holds options, and each option can carry its own upcharge that applies automatically the moment it’s tapped.
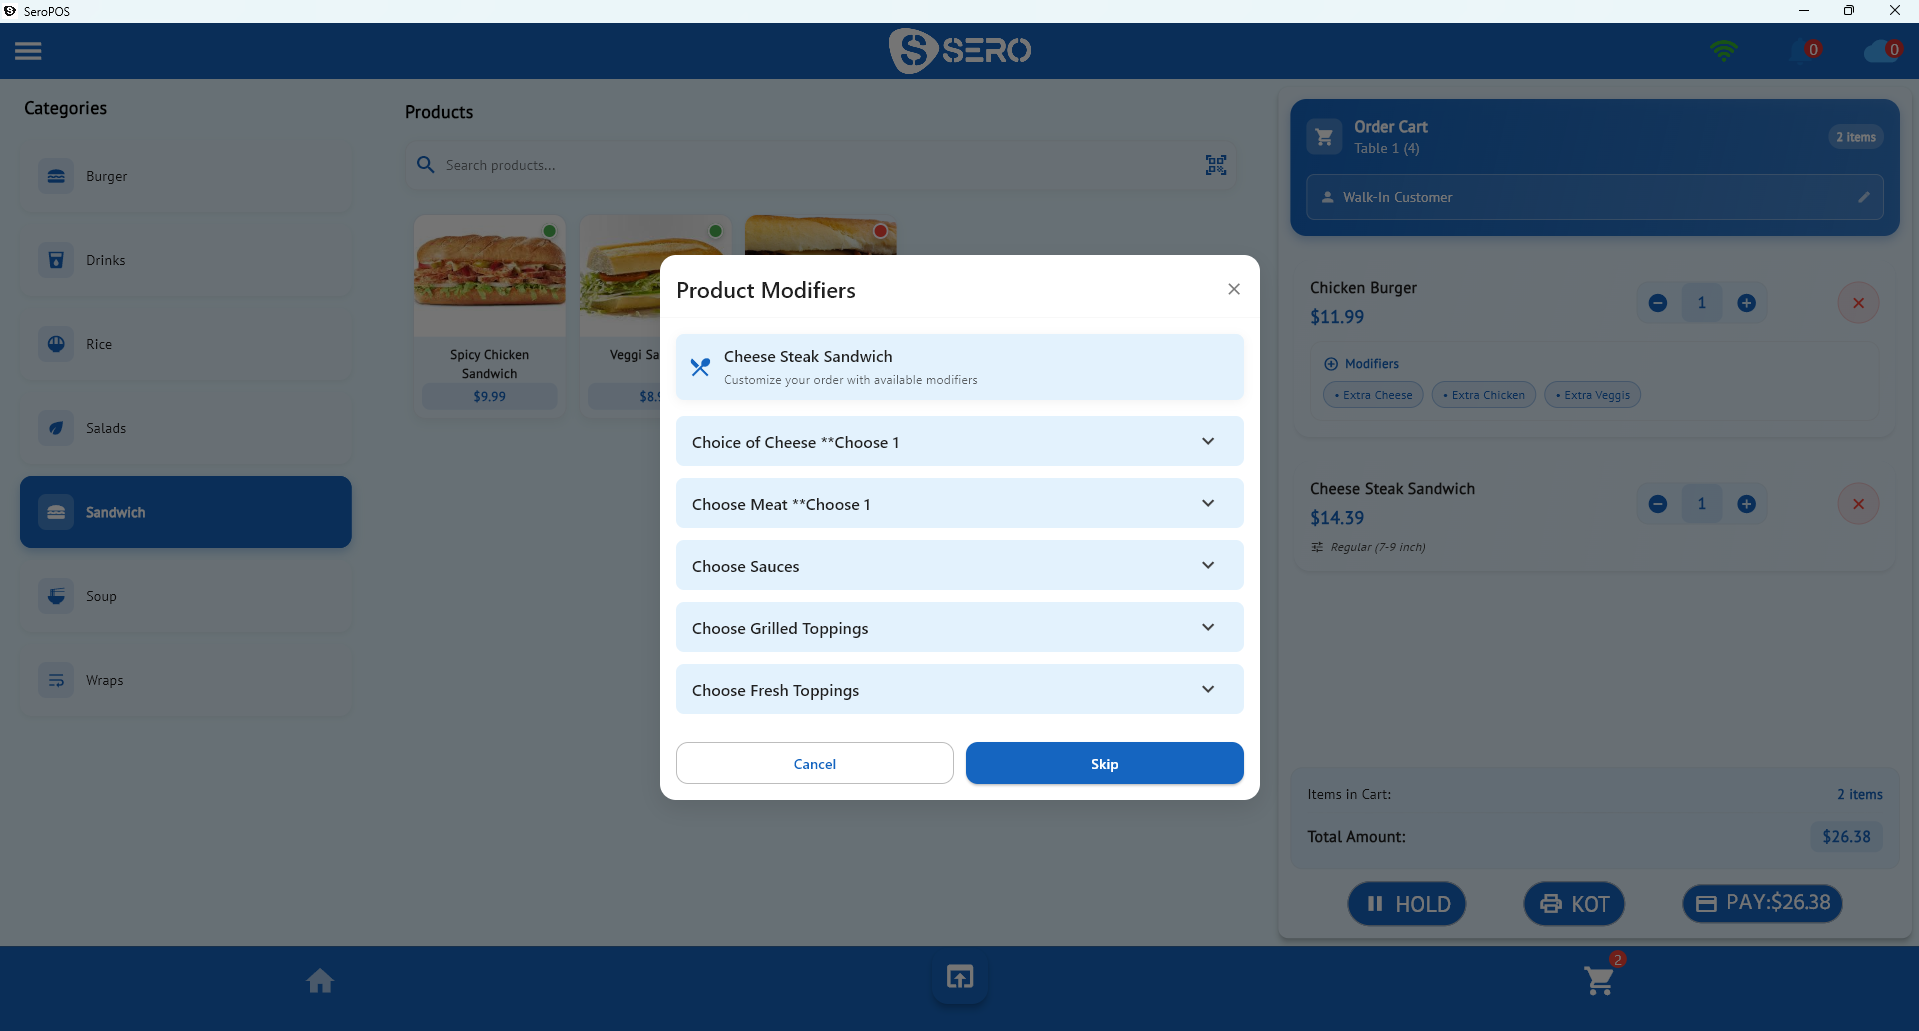
A practical setup for a typical pizzeria:
| Group | Type | Options | Pricing |
|---|---|---|---|
| Size | Required, pick one | 10” · 12” · 16” | Sets base price |
| Crust | Required, pick one | Thin · Regular · Pan · Gluten-free | +$0 to +$3.00 |
| Sauce | Required, pick one | Tomato · Garlic · BBQ · None | Free |
| Cheese | Optional, pick one | Regular · Light · Extra · Vegan | +$0 to +$2.50 |
| Left half toppings | Optional, multi-select | Your topping list | Per topping |
| Right half toppings | Optional, multi-select | Your topping list | Per topping |
| Whole pizza toppings | Optional, multi-select | Your topping list | Per topping |
Most orders only touch the “whole pizza” group — the half groups exist for when they’re needed and stay out of the way otherwise.
The half-and-half problem, solved
Half-and-half is where sloppy setups fail. If both halves share one topping list, the kitchen ticket says “pepperoni, mushroom, olives” and the cook has to guess the arrangement. Remakes follow.
Separate left and right groups fix this because the ticket prints exactly what the customer said:
LARGE PIZZA — Regular crust
LEFT:  Pepperoni, Mushroom
RIGHT: Olives, Green Pepper
Note:  Well done
That’s a ticket nobody has to interpret. The same clarity carries to the kitchen display if you use one instead of paper.
Pricing strategy: per-topping vs. tiered
Per-topping pricing gives each topping its own price. It’s transparent, easy to tune when your cheese cost jumps, and lets you charge more for premium items (chicken, prosciutto) than for onions.
Tiered pricing — “3 toppings included, extras $1.75” — is simpler for customers and prints tidier menus, but flattens your margins across cheap and expensive toppings.
Whichever you choose, apply it identically at the counter, online, and on the phone. Nothing erodes trust faster than a pizza costing $2 more in person than the website said.
Speed test your setup
Once configured, time yourself building these three orders:
- A large pepperoni — should be 3–4 taps
- A medium half-and-half with extra cheese — should be under 10 taps
- Two pizzas plus wings and a drink — should feel effortless
If any of those drags, fix the arrangement: put your top five toppings first in the list, cut duplicate groups, and make sure the popular sizes are on the left where thumbs land.
Keep every channel in sync
The reason to build modifiers properly once is that in SeroPOS the same setup powers:
- The register at your counter
- Your commission-free online ordering menu and QR code menu
- AI phone ordering, which reads your live menu to the caller
- Kitchen tickets and the kitchen display
One change — say, adding a hot honey drizzle at $1.25 — appears everywhere at once. See the whole restaurant toolkit on the restaurant features page.
Common mistakes to avoid
- Toppings as separate products. They belong as modifiers on the pizza, not as line items — otherwise your reports can’t tell you what actually sells.
- Free upcharges by accident. Audit your options list quarterly; an option with a missing price is silent lost revenue.
- Too many required groups. Every required tap slows the rush. Required should mean genuinely required.
- No instructions field. “Well done” and “cut in squares” need a home, or they end up on a sticky note.
Get this right and everything downstream gets easier: faster service, fewer remakes, accurate food costing, and reports that tell you which toppings actually earn their shelf space.
Download SeroPOS and build your menu during the 14-day free trial — no credit card required.